
HomeChocolate Sticks Recipe!!!!
Chocolate Sticks Recipe!!!!
If you’re looking for an easy, fun, and delicious treat that’s perfect for snacking, gifting, or decorating desserts, these homemade Chocolate Sticks are just what you need! Whether dipped in chocolate, rolled in sprinkles, or kept plain and simple, this recipe is versatile and sure to satisfy your sweet tooth. Let’s dive into making these delightful chocolate sticks!
Why You’ll Love This Recipe
Quick & Easy : Ready in under 30 minutes with minimal effort.
Perfect for Customization : Add nuts, sprinkles, crushed cookies, or even candy pieces for extra flair.
Great for Kids (and Adults) : Fun to make and enjoy—perfect for family activities or parties.
Versatile : Use as lollipop sticks, cake decorations, or standalone treats.
What You’ll Need
For the Chocolate Sticks:
2 cups high-quality chocolate chips (dark, milk, or white chocolate)
1/4 cup heavy cream (optional, for smoother texture)
1 teaspoon vanilla extract (optional)
For Coating & Toppings:HomeChocolate Sticks Recipe!!!!
Chocolate Sticks Recipe!!!!
Chopped nuts (almonds, peanuts, or hazelnuts)
Sprinkles (rainbow, jimmies, or holiday-themed)
Crushed cookies (Oreos, graham crackers, etc.)
Coconut flakes
Candy melts or drizzles
Equipment:
Popsicle sticks or skewers
Small silicone molds or wax paper
Microwave-safe bowl or double boiler
Baking sheet lined with parchment paper
Step-by-Step Instructions
Step 1: Melt the Chocolate
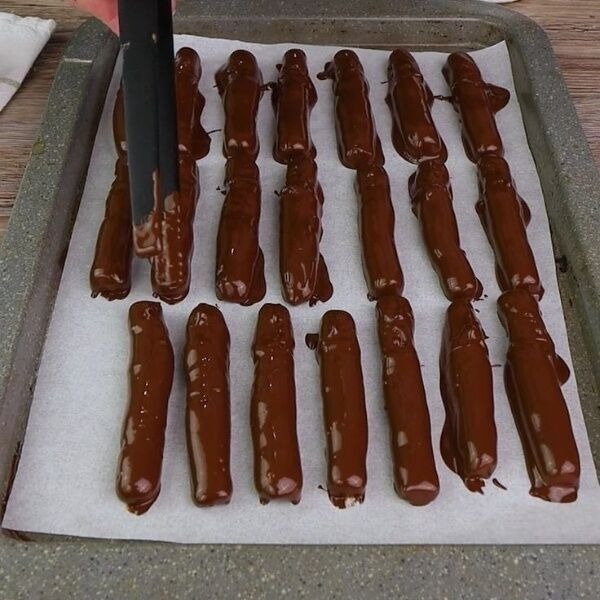
Place the chocolate chips in a microwave-safe bowl. Heat in 30-second intervals, stirring between each interval, until fully melted and smooth. Alternatively, melt the chocolate using a double boiler on low heat.
For a creamier consistency, stir in 1/4 cup of heavy cream and 1 teaspoon of vanilla extract.
Step 2: Prepare the Molds
If using silicone molds, lightly grease them with cooking spray or butter for easier release.
Pour the melted chocolate into the molds, filling them about halfway. Tap the molds gently on the counter to remove air bubbles and ensure even distribution.
Step 3: Add Toppings
While the chocolate is still wet, sprinkle your desired toppings evenly over the surface. Press them gently into the chocolate so they stick.
For layered designs, let the first layer set slightly in the refrigerator before adding another layer of chocolate and toppings.
Step 4: Insert Sticks
Carefully insert popsicle sticks or skewers into the center of each mold, ensuring they’re secure but not touching the bottom.
Step 5: Chill Until Set
Place the filled molds in the refrigerator for 20–30 minutes, or until the chocolate hardens completely.
If not using molds, pour the chocolate onto a baking sheet lined with parchment paper and spread it thinly. Let it chill, then cut into stick shapes once firm.
Step 6: Decorate Further (Optional)
Once set, drizzle additional melted chocolate, colored icing, or candy melts over the sticks for decorative flair.
Roll the edges in more sprinkles or crushed nuts if desired.
Step 7: Serve & Enjoy
SEE NEXT PAGE
ADVERTISEMENT
